How to Send Mail from Module

Create A Mailer
Email support can be a very strong drupal capability.
You can create emails according to events, news, etc. with personalization and desired format and template.
In some cases, you need to define the email in a way that it will not appear as spam on the target email server.
Email on general drupal events like creating new articles are covered with the rules module and you don't need to program their email support.
Sometimes we require emails to be sent on certain events e.g. for a blog website or a news site we may need to send an email after creating a new article or blog or in the case of an e-commerce site we may need to send confirmation mail after successful completion of an order.
Here we will be looking at how to send the email after the successful creation of the article.
Before creating specific email support, I recommend installing 2 modules:
1. Mail System - Provides an Administrative UI and Developers API for managing the used mail backend/plugin.
2. Swift Mailer - The Swift Mailer module extends the basic e-mail sending functionality provided by Drupal by delegating all e-mail handling to the Swift Mailer library.
Each mail to send is defined by its module and key, which you decide.
After first try, you can manage this mail request in the mail system, and set it a mailer according to module and key.
The Swift Mailer is a mailer system which support html mails, and also has a template which you can define according to your company needs.
You can install any mailer module or create one of your own, then you can manage each mail type, which mailer to use.
The Mail Hook
Creating your email support start with updating file: <yourmodule>.module with hook_mail()
/**
 * Implementation of hook_mail().
 */
function letter_mail($key, &$message, $params) {
    $text = array();

    $letter_id = $params['letter_id'];
    $complex_id = $params['complex_id'];
    $apartment_id = $params['apartment_id'];
    $from = $params['from'];
    $subject = $params['subject'];
    $text[] = $params['body'];
    $headers = $params['headers'];

    \Drupal::logger(__FUNCTION__)->debug("Body ".print_r($text, true));

    foreach ($headers as $header) {
        $header_full = $header['value'];
        $item = explode(':', $header_full);
        $message['headers'][$item[0]] = $item[1];
    }

    $message['from'] = $from;
    $message['subject'] = $subject;
    $message['complex'] = $complex_id;
    $message['apartment'] = $apartment_id;

    $message['body'] = array_map(
        function ($text) {
            return Markup::create($text);
        },
        $text
    );

}
$key: identify the mail
$message: passed by reference, and inside which we add as much boilerplate about our email as we need
$params: an array of extra data that needs to go in the email and that is passed from the mail manager when we try to send the email
The email hook mechanism update the mail message, few points to remember:
- The mail message is an array with build-in items
- The items: 'from', 'subject' are strings
- The item 'body' is an array of strings
- You can add your own message items, which will be set in template
- The item 'headers' is also an array predined items
The Mail Sender
To send mail we use the following build-in service and command:
$params = [
  'letter_id' => $letter_id,
  'complex_id' => $complex_id,
  'apartment_id' => $apartment_id,
  'from'=> $from,
  'subject' => $subject,
  'body' => $body2,
  'headers' => $headers,
];

$language = \Drupal::service("language.default")->get()->getId();

\Drupal::service('plugin.manager.mail')->mail('letter', 'send', $tenant_mail, $language, $params);
This can be in any function and can be operate from hook function or controller.
\Drupal::service('plugin.manager.mail')->mail(<modulename>, <key>, <target mail>, $language, $params);
$param is an array of information, it can hold any information you need for the letter. some of its items are mandatory like: 'from', 'subject', 'body' and 'headers'.
read more about the message header at iana
another example of preparing mail
<?php
/**
* Implements hook_entity_insert().
*/
function <module_name>_entity_insert(Drupal\Core\Entity\EntityInterface $entity) {

 if ($entity->getEntityTypeId() !== 'node' || ($entity->getEntityTypeId() === 'node' && $entity->bundle() !== 'article')) {
   return;
 }
 $mailManager = \Drupal::service('plugin.manager.mail');
 $module = ‘<module_name>’;
 $key = 'create_article';
 $to = \Drupal::currentUser()->getEmail();
 $params['message'] = $entity->get('body')->value;
 $params['node_title'] = $entity->label();
 $langcode = \Drupal::currentUser()->getPreferredLangcode();
 $send = true;

 $result = $mailManager->mail($module, $key, $to, $langcode, $params, NULL, $send);
 if ($result['result'] !== true) {
   drupal_set_message(t('There was a problem sending your message and it was not sent.'), 'error');
 }
 else {
   drupal_set_message(t('Your message has been sent.'));
 }

}
This will gets triggered every time any Article will be created.
Every time when we will create an Article, we load the Drupal Mail manager service and start setting values for email.
We need the following information:
- $module - The module name that implements hook_mail() and defines our template
- $key - The template id
- $to - The recipient email address (the one found on the current user account)
- $langcode - The language which goes inside the $params array and which will be used to translate the subject message
- $params['subject'] - Email subject
- $params['message'] - The email body
- $send - The boolean value indicating whether the email should be actually sent
We then pass all these values to the mail() method of the mail manager.
The latter is responsible for building the email (calling the right hook_mail() implementation being one aspect of this) and finally delegating the actual delivery to the responsible plugin.
By default, this will be PHPMail, which uses the default mail() function that comes with PHP.
And this is all about sending emails programmatically using Drupal 9.
We have seen the steps required to send email programmatically by the mail manager whenever we want it.
We have also mentioned the default mail delivery plugin which is used to send emails in Drupal 9.
Explaining the Drupal code
1. hook_mail() in .module file
First of all, to make use of the Drupal's mailing system: you need to implement hook_mail in the .module file:
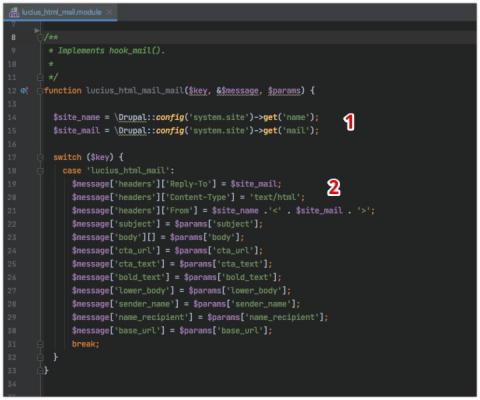
- Get global site name -and email.
- This took a loooooooooooooooooooong time to figure out, but you need to define these headers to make Drupal html mails work.
- Additional parameters to fill Twig html email template.
2. Custom Drupal Mail Service 'lucius_html_mail.mail'.
I implemented a custom Drupal Service 'lucius_html_mail.mail', for among other things scalability: this service handles all generic stuff for email sending, while other modules can use this service via Dependency injection and send mails with different parameters: message content in this case.
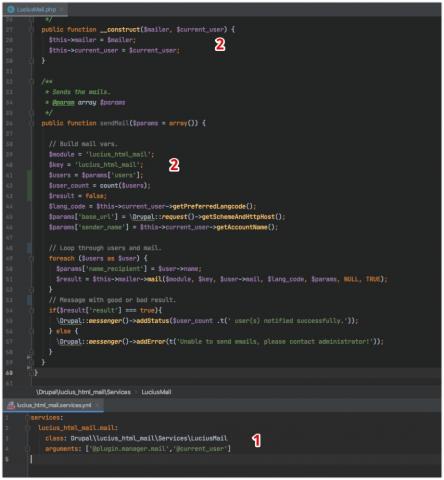
- Define our custom Mail Service and inject 2 external Services.
- Constructor to facilitate the 2 external Services.
- Build the mailing variables, loop through users, get name and email, finally send mails.
3. Drupal Route and Controller to test and send example emails
I defined a route '/send_test_mail'. If you head over to that url in your browser, the code in sendTestMail() will execute.
If all is ok: all users will receive the example mail.
!) So make sure you're testing this in an environment where mails can't go to the outside world, we use local Docker with Mailhog for example. (!
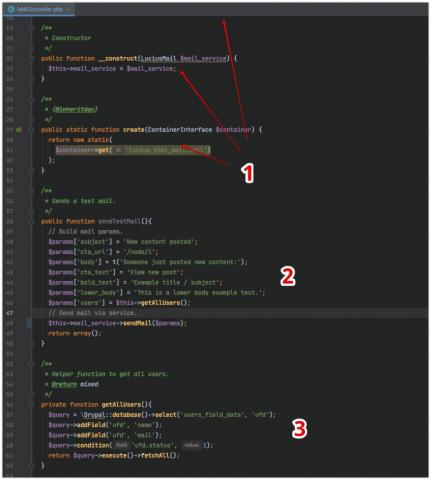
- Drupal's Dependency Injection in action: inject our custom Service 'lucius_html_mail.mail'.
- Prepare all paramaters for the mail with static example texts. Then send the mails via our Service method 'sendMail()'.
- Simple helper function to get all users.
So, if you head over to '/send_test_mail', all users should receive an email that looks like this:
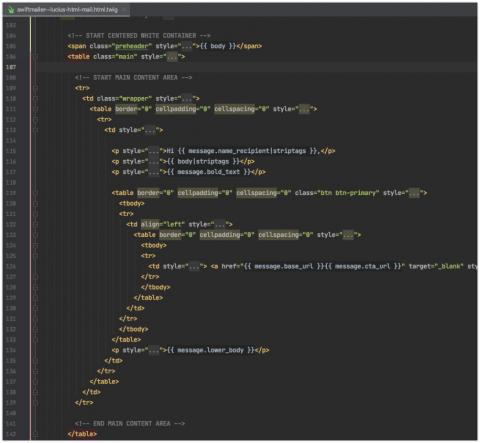
4. Custom Twig override file 'swiftmailer--lucius-html-mail.html.twig'
As mentioned earlier, swiftmailer--lucius-html-mail.html.twig should be copied somewhere to your custom theme's /templates folder. I found this html code in this open source repo. It's even responsive and uses a lot of inline styles, needed to make it compatible to all major email clients.
As you can see, there are Twig variables, mostly I use the values in the $message array. These variables match the parameters we build earlier. Function Lucius_html_mail_mail() (hook_mail) turned our parameters into one $message array, which can be used in the Twig template as shown in above image.
So tune this template anyway you like, or implement a complete new one with other variables. It's all in your hands now, make it the way you want in a clean, responsive and scalable way!
Handy: Twig template file override suggestions
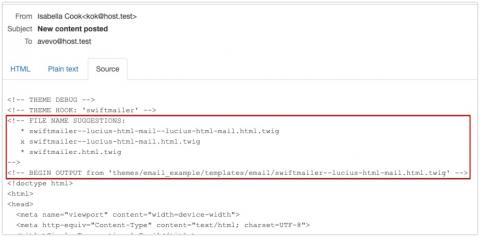
If you turn on Development mode in Drupal, you can see all template suggestions to go even further down/up the road:
