React in Drupal - starter
Step 1: install the node.js on your server
make sure all apache modules are installed
if you not able to install mod_passenger, try see if you have rubi_mod_passenger
Node.js is an open-source cross-platform JavaScript (JS) runtime environment. If you need to build fast and scalable network applications, you may want to think about using Node.js. Apart from offering various JS modules, it is also lightweight, efficient, and supports consistent and integrated development.
Node Package Manager (npm) is Node’s official package manager, used for installing and managing package dependencies.
In this guide, learn how to install Node.js and npm on CentOS 7. We also cover managing multiple Node versions and installing dependencies.
after installing all mods needed on the server, go to your cPanel and check:
- the node.js version: node -v
- the npm version: npm -v
Here are couple command which can help:
- npm -v
- node -v
- nvm alias default v10.24.1
- nvm list
- nvm install v10.24.1
- npm install npm@6.14.12
- nvm use node v10.24.1
- nvm install node
- nvm install node 10.24.1
Step 2: Install the React engine
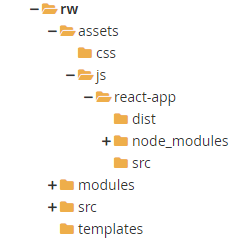
open terminal at your VPS (cPanel) and browse to the your module
In module (rw), browse to folder: js (or create it) and create child folder: react-app
in 'react-app' folder activate the following command:
npm init
on root system, you can install node.js with the following command
(you don't need to do so on cPanel systems, since it might be package issue)nvm install node
node -v > .nvmrc
this will create your first “package.json” file, so follow its route, you can always change/update it .
also it will create the following files and react modules/structure
if needed you can Install required dependencies such as react, react-dom, and other React

npm install react react-dom
this will create folder name: node-modules
create folder named: components
'src' folder will be created with index.js inside
you can see all react modules version in file: package.json
activating: npm install
will re-install all version defined in package.json
you should add these two lines in your script block, see below example of my package.json
{
  "name": "react-app",
  "version": "1.3.0",
  "description": "test 2",
  "main": "index.js",
  "author": "yuval",
  "license": "ISC",
  "devDependencies": {
    "@babel/cli": "^7.24.1",
    "@babel/core": "^7.24.3",
    "@babel/preset-env": "^7.24.3",
    "@babel/preset-react": "^7.24.1",
    "babel-loader": "^8.0.4",
    "webpack-cli": "^4.10.0"
  },
  "dependencies": {
    "react": "^18.2.0",
    "react-dom": "^18.2.0",
    "webpack": "^5.91.0"
  },
  "scripts": {
    "watch": "webpack --watch --progress",
    "build": "NODE_ENV=production webpack"
  }
}
when testing and packaging script you can use these two command:
npm run watch
npm run build
the last, create js script under folder: 'dist' : app.bundle.js
under folder: react-app/src, I put script name: index.js
this is the main script for the react application, see how it is configured in the package.json
Here is my index.js
import React from 'react';
import ReactDOM from 'react-dom';

let helloElement = React.createElement(
  "h1",
  { id: "greeting", className: "hello" },
  "Hello, World!"
);
let rootElement = document.getElementById("react-root");
ReactDOM.createRoot(rootElement).render(helloElement);
the react render will be activated on element id: react-root
now to see the react application outputs we need to integrate it with Drupal, which send us to step 3
Step 3: Integrate it into Drupal Module
now that we have react app within the module, we need to set the correct pointers for the module to work with it.
(in this manner we can integrate many javascript technologies, and even few of each type)
let's start by updating/creating the module libraries configuration, my module name is: RW
I created file called: rw.libraries.yml, and set it in my module route folder
react_app:
    js:
        assets/js/react-app/dist/app.bundle.js: { minified: true }
now I need to decide how do I want to output the desired html element block, in order for the react application to work on it. there are few options to do that:
1. by template
2. by form
3. by block
etc.....
for this tutorial I will do the integration in a block level
so now I will create a simple custom block
The new block code should be set in rw/src/Plugin/Block, I named it: HelloWorldBlock.php
  namespace Drupal\rw\Plugin\Block;
  use Drupal\Core\Block\BlockBase;

  /**
   * Provides a 'HelloWorld' Block.
   *
   * @Block(
   *   id = "rw_react_block",
   *   admin_label = @Translation("RW with React"),
   *   category = @Translation("RW"),
   * )
   */
  class HelloWorldBlock extends BlockBase {
    public function build() {
        $build = [];
        $build['react_block'] = [
            '#markup' => '<div id="react-root"></div>',
            '#attached' => [
                'library' => 'rw/react_app'
            ],
        ];
        return $build;
    }
  } // end of class
The block id is: rw_react_block
the build command set the div element which the react application will operate: id="react-root"
you can see that the library attached is: rw/react_app
now all you need to do is to position the block from the Drupal block layout configuration
in case library is not loaded, you can load it via the module file: rw.module
add the following lines in your_module.module files:
    function rw_preprocess_block(&$variables) {
      if ($variables['plugin_id'] === 'rw_react_block') {
        $variables['#attached']['library'][] = 'rw/react_app';
      }
    }
see the block id, and the library attached
this is it.
from here it will get more complicated. enjoy

Code Snippet
import React from 'react';
import ReactDOM from 'react-dom';

let helloElement = React.createElement(
  "h1",
  { id: "greeting", className: "hello" },
  "Hello, World!"
);
let rootElement = document.getElementById("react-root");
ReactDOM.createRoot(rootElement).render(helloElement);